
Datasets
A dataset is a collection of files that already exist in Synapse that may be hosted in one or more Synapse projects or folders. You can create a dataset that includes any files that you have read access to, whether you have own/edit access to them or not.
You can use a dataset to:
Collect and distribute a set of files generated from the same study or project
Create a single item to represent a group of files that exist across disparate projects or folders
The main use cases of datasets are to allow you to collect and share immutable sets of items, which:
You created and want to distribute to the community
You created and want to connect with a publication or tool
You found in Synapse and used as part of your own research, and want to distribute
Although a dataset is similar to a file view, it serves different purposes. While a file view allows you to set a scope for a folder that could be continuously updating, a dataset includes specific versions of files that you determine when setting it up.
After creating a dataset, it will exist as a draft version, meaning you can continue editing it as you wish. You can also create a stable (static) version of the dataset at that point in time, which cannot be changed. You can share this stable version with others, or link it to a publication, by minting a DOI.
Since you can create and share a dataset with files you do not own, it’s important to ensure that you follow the Synapse Terms and Conditions of Use.
When to use a dataset vs. a file view
As mentioned, a dataset is similar to a file view in that its purpose is to group a specific set of files together, there are distinct differences between the two, which may determine when you would use one over the other. Review the table below for a summary of these differences.
Datasets | File Views | |
|---|---|---|
Underlying object type | ||
Method for adding files | Select specific versions of individual files | Select projects and folders, including the latest version of all contained files, tables, or datasets |
View and query file annotations | ✔ | ✔ |
Edit file annotations in bulk | ✔ | |
Versioning/snapshot functionality | ✔ | ✔ |
DOI functionality | ✔ | ✔ |
Limit on number of files | 10,000 | up to 350,000,000 with appropriate project/folder structure (see View Limits) |
How to create a dataset
Create a dataset
Navigate to the project that you want to create the dataset in
Click the Datasets tab
Click Add Dataset
In the Create Dataset window, enter a name for the dataset
Click Finish
You will now be directed to the new dataset that you just created (it will be empty at this point).
Notice the banner indicating that this is a draft version of the dataset. A draft dataset should not be distributed externally until it is finalized by creating a stable version. See the section Create a Stable Version below for more information.
Add files to the dataset
In the dataset, click Add Items
In the Add Files to Dataset window, browse for the file(s) you want to add
Click on the name of a project to see all folders, files, and tables contained within that project. Note that only files can be selected and added to the dataset
If you want to see the contents of an individual folders, click the dropdown arrow next to a project name, or next to a folder, to reveal all of its contents. This will allow you to select in individual files contained within
You can also search for individual files using the Search for Files tool (Note that you cannot use this tool to search for folders or projects, only individual files)
Click the checkbox next to any of the file(s) that you want to add. If you want to add all files from within a folder, you can click the general checkbox at the top of the list to add all contents. You can also select which version of the file you want to appear in your dataset.
 Find more information at Versioning Tables, Views, and Datasets.
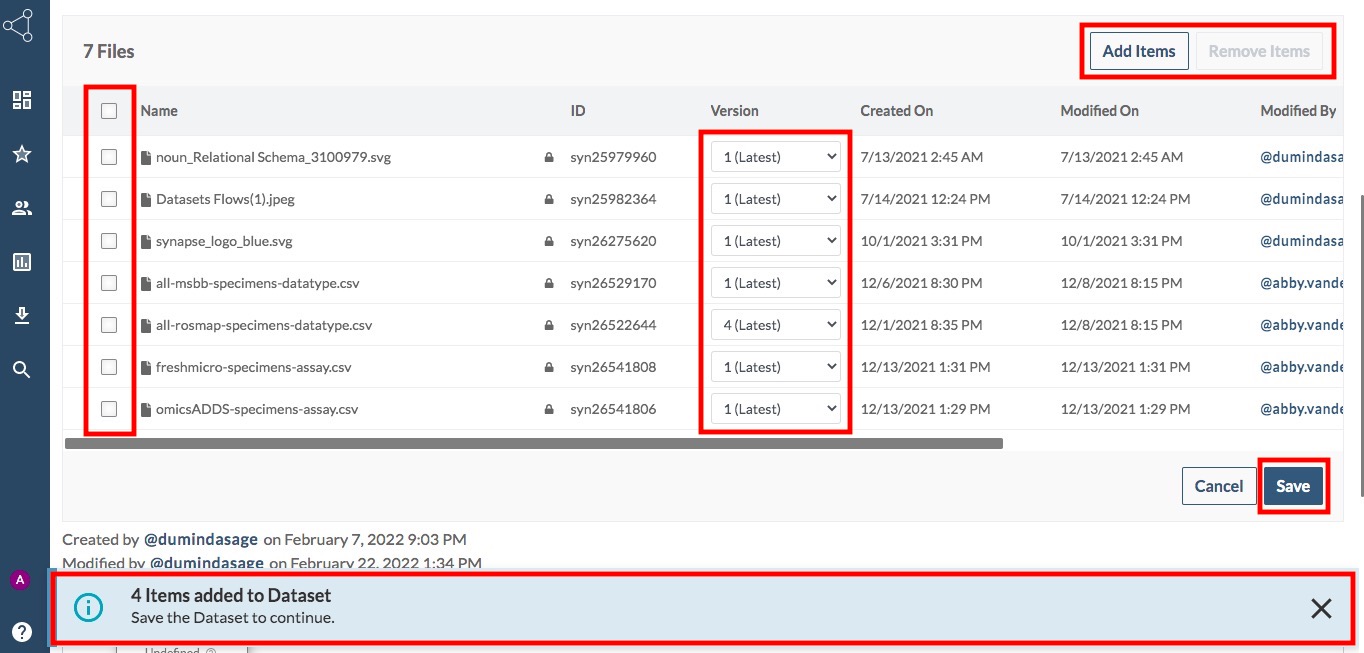
Your selections will appear in the Selected box at the bottom. They will remain in this “selected” status, even as you navigate through other folders and files. You can remove individual selections from here if necessary.Once you have selected all of the files you want, click Add Files. All files from your Selected box will be added to the dataset. At this point, before saving the dataset, you can still add or remove files from the dataset, or change the version of any files (see screenshot below)
Click Save to save your current selection and return to the draft dataset
In the screenshot below, notice how there are several actions you can take after adding new files, before saving this version. You can use the checkmarks to select any of the files and remove them, or use the Version dropdowns to change the version selection of any file. You can also add new files. Note that you can also edit the draft dataset after saving, but if you create a stable version then it will reflect the selection that you included at the time of creation. See the section Create a Stable Version below for more information.
How to use a dataset
Once you have created a draft dataset, there are a number of things you can do to it, similar to other features in Synapse. This includes:
Create a stable version (a static snapshot of the dataset)
Edit sharing settings
Annotate the dataset with metadata (in order to query for sets of datasets)
Create a wiki (add documentation of the dataset using the wiki)
Edit the dataset column schema
Mint a DOI
These actions are described below or linked to other help articles.
Create a stable version
A dataset can exist as a draft or stable version.
A draft dataset is mutable, meaning that it can be edited. A stable version is a snapshot of the dataset at the moment the version was created. The version will have a synID which is appended with a number based on which version it is. For example, syn123456.2 would be version two of syn123456.
Only stable versions should be shared with others, or included in downstream resources, as only stable versions are immutable (static and uneditable). If a file is deleted from Synapse, its metadata will still be visible in any stable dataset version that included that file. However, if another user clicks on that dataset version, they will find that it no longer exists. Such a deleted file may still be visible, but it no longer physically exists.
It is important to note that the wiki, sharing settings, and annotations remain the same between the draft dataset and the stable version.
Here’s how to create a stable version:
Click Dataset Tools and select Create a Stable Dataset Version from the dropdown menu
In the Create Stable Version window, add an appropriate label for the version, and a comment if necessary. Note that you do not need to add a version number, since is is already added for you
You will now see the new version, as well as the full version history. From here, you can go back to your draft.
Edit sharing settings
In the dataset, click on Dataset Tools, and select Dataset Sharing Settings from the dropdown menu. This will show you the current sharing settings of the dataset. Note that sharing settings of the dataset will be inherited from any parent projects or folders. If you want to have different settings on a specific file, you can create local sharing settings and then modify them.
![]() For more information on sharing settings, see Sharing Settings, Permissions, and Conditions for Use.
For more information on sharing settings, see Sharing Settings, Permissions, and Conditions for Use.
Annotate the dataset with metadata
If your dataset is included in a view, you may wish to customize how you or others are able to query your dataset. If this is the case, you can add annotations so that you and other users can query for this dataset on custom keys. Another reason for adding annotations is to make your dataset findable using the search tool in Synapse.
To add annotations to a dataset:
Once in the dataset, click Dataset Tools and select Annotations from the dropdown list
In the My Dataset window, click Edit
As the on-screen instructions state, click the Add icon to begin adding annotations
Complete your annotations using the fields provided
Use the + button to the right of each row to add a new value for any Key
Use the x button to the right of each row to delete that row
Click the Add icon to add another Key
Click Save
Edit the dataset schema
You can customize the visible columns of a dataset. These columns will be auto-populated based on the annotation values of the underlying files in the dataset. Here’s how to customize these columns:
In the dataset, click Dataset Tools, and select Show Dataset Schema from the dropdown menu
Click Edit Schema at the bottom of the table
In the resulting Edit Columns window, you can add columns to your dataset schema using any combination of these three options:
Click Add Column to manually add individual columns one by one. If these columns exist as annotations on one or more of the files in the Dataset, the values will be displayed in the Dataset. You cannot use a Dataset to bulk annotate files, so do not add columns that do not already exist as annotations, since this will not serve any purpose.
Click Add Default Dataset Columns to add the default columns used in Datasets
You can then customize this list by removing any of the default columns you don’t want to be included—to do so, click the checkbox next to any column(s), followed by the trash can icon at the top.
Click Import columns to import columns from another table in Synapse. Again, only columns which already exist as underlying annotations will be relevant.
Once you have added all columns of interest, you can:
Use the arrows at the top to reorder the columns
Enter any values as needed in the Restrict Values column
Select/change any column facet using the Facet dropdown
Click Save
Mint a DOI (digital object identifier)
You can use a DOI (Digital Object Identifier) to generate a permanent link to the dataset.
![]() Find more information and instructions at Digital Object Identifiers (DOIs).
Find more information and instructions at Digital Object Identifiers (DOIs).