
Creating and Managing Wikis
Important: Wiki pages do not have specific conditions for use. Do not put any protected human data in Synapse Wikis.
Wikis provide a space to write narrative content to describe a project or content within a project. Wikis are available in Synapse on projects, folders, and files. Every project has a separate Wiki tab where you can create pages and a hierarchy of sub-pages.
Wiki pages can be written using plain text, basic HTML, or Markdown. If you choose Markdown to write your wiki, a formatting guide is available within the wiki editing window (it is also available as a wiki here). Useful shortcuts are also available in the wiki editor tool bar, including: heading, bold, italic, strike-through, code block, subscript and superscript.
A wiki inherits its sharing settings from the project, folder, or file it is associated with, and it cannot have separate sharing settings. Anyone with ‘view’ permissions or greater can see the content of the wiki page. When a project, folder or file is shared with the public, the associated wiki is visible to viewers who are not logged in to Synapse.
You can create wikis using the Synapse UI or programatically. Like files, folders, and other objects in Synapse, wikis have a unique Synapse ID (synID) associated with them, and you can use this synID to reference them elsewhere.
Creating, Editing, and Deleting a Wiki via the Synapse UI
Within an existing project or a new one, click the Wiki tab. Navigate to the Wiki Tools menu and select the Edit Project Wiki. Content in this project wiki becomes your project’s home page. You can add subpages to your project wiki that will become links on the left side of your home page (read more in the subpages section below).
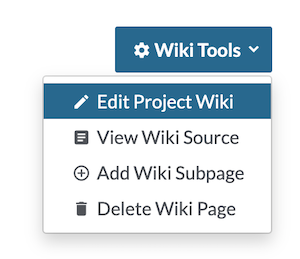
To add a wiki to a folder or file, navigate to the folder or file and select Edit Wiki from the Tools menu. Content added to a wiki can be previewed before saving. To delete a wiki select Delete Wiki Page under the Wiki Tools menu.
Creating a Wiki Programatically
Command line
The command line client does not support the creation of wiki content.
Python
import synapseclient
syn = synapseclient.login()

projWiki = Wiki(title='Data Summary', owner = myProj)
markdownText = '''This is an example sentence.'''
projWiki['markdown'] = markdownText
projWiki = syn.store(myWiki)
R
library(synapser)
synLogin()

markdownText <- "This is example sentence."
wiki <- Wiki(owner="myProj", title="Data summary", markdown=markdownText)
wiki <- synStore(myWiki)
Creating Page Hierarchy with Subpages
A project wiki can have subpages, which will appear nested below the main wiki page. Creating subpages will also create a navigation bar on the left side of the screen that lists the wiki subpages in the order they were created. Links to wiki subpages include the project ID, the wiki path, and the ID of the wiki page (e.g. https://www.synapse.org/#!Synapse:syn150935/wiki/27376 ). The subpage ID can be found in the browser URL bar when the subpage is viewed.
To add a subpage, use the Wiki Tools menu and then click Add Wiki Subpage. You can edit this sub-page like any other wiki page through the Wiki Tools menu and Edit Project Wiki.
Modifying Page Order
By default, wiki pages are created at a single level, or without a page hierarchy. As your wiki evolves over time, you may want to change the order and hierarchy of pages. To do this, click the Edit Order button below the wiki page navigation bar to change both the order and hierarchy of pages within a particular level. Click Edit Order, and then select the page you want to move. Use the arrow buttons to move the page up or down in your page tree. Use the left and right arrows to nest subpages deeper or promote them higher in a page hierarchy. When you are finished, click Done to save your work. Note that only users with the ability to edit the wiki content have the ability to edit the wiki order. Changing the wiki order does not change the synID of the wiki page.
Wiki Widgets
Widgets are Synapse features that can be added to supplement any Markdown text and customize your wiki. These include inserting images, tagging individuals, querying tables, and more. Use the Insert menu at the top of the wiki editor window to select a widget. Each of these widgets is described in the following table.
To edit widgets after they have been added to the wiki, use the Edit Synapse Widget button in the upper left hand corner of the wiki editing window. Click on the Markdown text for a widget, and then click Edit Synapse Widget to view the widget configuration window again.
Widget | Description |
|---|---|
Attachment | Attach a file from your local computer to the wiki. |
Button Link | Insert a button that links to content within Synapse or elsewhere. Tip: buttons can be colored purple by adding |
Collapsible Section (Details/Summary) | Insert a label or heading that you can click to expand and reveal additional text. |
Entity List | A list of Synapse folders, files or tables can be created by browsing to the Synapse location or searching by entity name or Synapse ID. The table lists entity name, date entity was created, who created it, and version and version notes (if selecting files, tables, or views). |
File Preview | Embeds a preview window for .csv, .txt, and image files |
Genome Browser | You can add a Biodalliance genome browser using tracks from files uploaded to Synapse or from external sources. Choose between Human or Mouse and adjust your tracks for height and color. See the Genome Browser section below for more information. |
Image | Embeds an JPG, PNG, GIF or SVG. The image can be uploaded, from the web, or from a Synapse file. Note: Images file names that have certain words (ie, ‘ad’) could be blocked if you are using an adblocker. |
Join Team Button | Provide a button for people to join Synapse teams. |
Link | Insert a URL or Synapse ID linked to text. |
Provenance Graph | Embeds the provenance graph created for a file. |
Reference | Create a reference list by linking to papers using the References widget. |
Simple Plot | Insert a simple bar chart from a file or table. |
Submit to Evaluation | Create a button for users to submit their entries to a Synapse challenge. |
Table: Paste tabular data | A table can be created of any data by pasting tab delimited content into this widget window. |
Table: Query on a Synapse Table/View | Provides a query for any Synapse table or view and displays the information in the wiki. |
Table of Contents | Creates a content list that links to sections of the wiki based on headers and subheaders. |
Team Badge | Creates a link to the team profile. |
Team Member Count | Select a team to display the team member count. |
Team Members List | Select a team to display a table of the team member names, institutions, and Synapse email addresses. |
User | Tag a user by entering their Synapse username. You can also do this by typing ‘@’ while editing a wiki and enter the Synapse username or part of their full name in the dialog that appears. |
Video | Video, Vimeo Video, and YouTube Video insert a video from various sources. |
Widgets in Experimental Mode
Some widgets are available only in experimental mode. These widgets are still under development but are available for public use. To access these widgets, navigate to the lower right hand corner of your screen in Synapse, and click Experimental Mode Off. Read the experimental mode statement and click OK. Navigate back to a wiki page, where a new @ Insert menu option will appear at the top of the wiki editing window with a list of widgets in development. Use these widgets with caution, as they may change in the future and data created using them could be lost during upgrade.
Adding a Table or View to a Wiki
Wiki table widgets allow you to embed tabular data into a wiki, enabling quick access to files or data. There are two ways to embed tabular data into a wiki: either paste the data directly, or select data from existing tables or file views in Synapse.
Pasting Tabular Data
To embed tabular data in a wiki page, navigate to the wiki and select Wiki Tools, then Edit Wiki. From the Insert menu in the wiki editing window, select Table: Paste Tabular Data. In the next window, paste tab delimited data and click Save.
Selecting Data from a Synapse Table or View
If you uploaded a table or created a view in Synapse, you can use the Table: Query on a Synapse Table/View widget to add the entire table or view to your wiki. You can also choose to add only a subset of your table or view using a SQL-like query.
Focus Scope
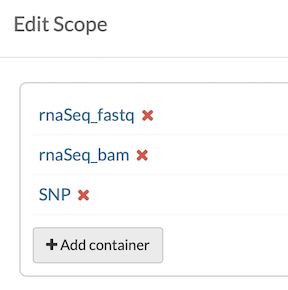
In the example below, a specific subset of data from a file view is embedded in a wiki. This file view contains both RNA-Seq and SNP genomic data, as depicted in the file view scope shown in the image below. The scope can be restricted to RNA-Seq data with additional queries on the embedded table. This example will demonstrate how to highlight .fastq and .bam RNA-Seq files in an embedded wiki table, so that team members have a clear path to access files for reproducible studies.
Restricting a Query
A table query is required to embed table or file view data into your wiki. In this example, the parent file view is a combination of multiple assay types, and the query is restricted to isolate relevant RNA-Seq entries. Additionally, the columns can be limited to ensure only imperative information is visible in the wiki.
In this example query below, only the columns for ID, version, file format, assay type, genome build, and date modified will be displayed from syn17097374. From that data, only data where assay type is recorded as rnaSeq and file format is bam or fastq will be shown in the wiki table.
SELECT id,currentVersion,fileFormat,assay,genomeBuild,modifiedOn FROM syn17097374 WHERE "assay" = 'rnaSeq' AND "fileFormat" = 'bam' OR "fileFormat" = 'fastq'
Embedding a Table
Navigate to Wiki Tools to Edit Project Wiki or to Folder Tools to Edit Folder Wiki. From the wiki editing window, select Insert and Table:Query on a Synapse Table/View to insert the intended file view query. The result is a direct link to relevant files from a wiki page. Add narrative text to provide additional information or context for this view.

Forms
Forms collect data from Synapse users and put it into a Synapse table. Forms are currently available only in experimental mode as they are not yet ready for full release; please use wiki forms only with this caveat in mind.
With forms, you can:
Create surveys to collect feedback
Crowdsource data collection
Allow others to contribute data through a user-friendly user interface
Creating a Table
In order to use forms, you’ll need to create a table first.
![]() Learn about creating tables at Organizing Data With Tables.
Learn about creating tables at Organizing Data With Tables.
Activating and Deactivating Experimental Mode
On the right side of the Synapse footer, you will see Experimental Mode Off. Click this text to read a statement about enabling experimental mode, and click OK if you agree to the terms. Doing so enables a small number of new widgets in our wiki pages, all available under under the @ Insert menu in the wiki editing window.
You can also deactivate experimental mode at any time; click on Experimental Mode On to deactivate it and return to the default Synapse product.
Creating a Form
Once experimental mode has been activated, visit the wiki page where you’d like to insert the form. Click on Edit Project Wiki and select the @ Insert menu. Select Synapse Form from the menu and enter the table synID into the resulting pop-up window. The following Markdown text will be added to your wiki.
${synapseForm?tableId=syn123&successMessage=Your response has been recorded}
Optionally, you can add a customized “success” message for users by editing the Markdown text. When a form is submitted, it will create a new row in a Synapse table.
Column names are used as question prompts. Each column will appear as a separate question for users to answer.
The possible values for an enum column type, for example, will be a represented by a multiple choice question.
The form is also responsive, so it will render on both large and small screens.
Allowing Others to Contribute
Entering data into a form is equivalent to editing the data in a table, so users who wish to add data using the form will need to have Edit permissions on the table.
![]() See Sharing settings for more information on controlling who can edit your table.
See Sharing settings for more information on controlling who can edit your table.
Genome Browser
Biodalliance Setup
Species = Supports human (hg19/Gr37) and mouse (mm10/Grch38) genomes
chr = Chromosome number
viewStart = Start position
viewEnd = End position
Supported File Types
BIGWIG
Source name = Track name
File = synID of a bigwig file (.bw, .bigWig)
Height = Height of the track (pixels)
Color = Color of the track
VCF/BED
Note: To embed vcf and bed files, the files must be in the correct format. Please view how to prepare vcf and bed files below if they are not in the right format.
VCF (.vcf.gz AND .vcf.gz.tbi)
Source name = Track name
File = synID of a compressed vcf file (.vcf.gz)
Tabix file: synID of a tabix index file (.vcf.gz.tbi)
Height = Height of a datapoint glyph in the track (pixels)
Color = Color of the track
BED (.bed.gz AND .bed.gz.tbi)
Source name = Track name
File = synID of a compressed vcf file (.vcf.gz)
Tabix file: synID of a tabix index file (.vcf.gz.tbi)
Height = Height of a datapoint glyph in the track (pixels)
Color = Color of the track
Preparing VCF and BED Files
1. Download and build the tabix and bgzip programs
2. Compress your .vcf or .bed file using bgzip (example.vcf -> example.vcf.gz, example.bed -> example.bed.gz)
#vcf
bgzip example.vcf
#bed
bgzip example.bed
3. Create a tabix index file for the bgzip-compressed vcf or bed (example.vcf.gz.tbi, example.bed.gz.tbi)
#vcf
tabix -p vcf example.vcf.gz
#bed
tabix -p bed example.bed.gz
4. Upload both onto Synapse and enjoy Biodalliance!