
Managing Files and Folders
This tutorial will guide you through fundamental Synapse features for managing files and folders with the web interface. You will learn how to:
Add a folder to a project and upload a file
Annotate a file
Add a description to your folder with a wiki
Download a file
Prerequisites
Anyone can browse public content on the Synapse website, but to download and create content using this tutorial, you will need to register for an account using your email address. You will receive an email message for verification to complete the registration process.
To upload files to Synapse, you will need to perform the additional step of becoming a certified user. Because Synapse stores data from human subjects research, we require that you demonstrate an understanding of our governance, including comprehensive privacy and security issues. You can complete your certification by taking a short certification quiz on Synapse.
Before you begin this tutorial, make sure you have already created a project. If you haven’t already, see the use case Setting Up a Project.
Uploading a File
Synapse can be used to store files of all types. All files that you upload to a project will appear in the Files tab, which is the root directory. You can also create nested folders within a Synapse project to manage files and keep them organized.
To upload a file:
Within a project, navigate to the Files tab.
Click the File Tools menu to select Upload or Link to a File.
Use the Browse button to select the file, or drag and drop it to upload, and click Save.
To create a folder and upload a file:
Navigate to the Files tab.
Use the Files Tools menu to select Add New Folder.
Decide on a folder name and click Save.
Navigate into your new folder by clicking on the name, then use the Folder Tools menu to select Upload or Link to a File.
Use the Browse button to select the file, or drag and drop it to upload, and click Save.
![]() To learn about setting restrictions on your data, see Sharing Settings, Permissions, and Conditions for Use.
To learn about setting restrictions on your data, see Sharing Settings, Permissions, and Conditions for Use.
![]() Other features available for files and folders include Digital Object Identifiers (DOIs), Versioning Files, and Provenance.
Other features available for files and folders include Digital Object Identifiers (DOIs), Versioning Files, and Provenance.
Adding a Folder Wiki
You can add a description to the folder you just created by adding a folder wiki. Wikis can be added to projects, folders, tables, and files in Synapse, and they can help you communicate essential details, instructions, or other information about your work to other collaborators.
To add a wiki to the folder you just created:
Navigate to the Files tab.
Select the folder you just created and navigate into it.
From the Folder Tools menu, select Edit Folder Wiki.
Type a description of your folder contents in the wiki editing window, then click Save.
Your wiki content will be visible to anyone who has access to your folder.
![]() To learn more, see Creating and Managing Wikis.
To learn more, see Creating and Managing Wikis.
Annotating Files
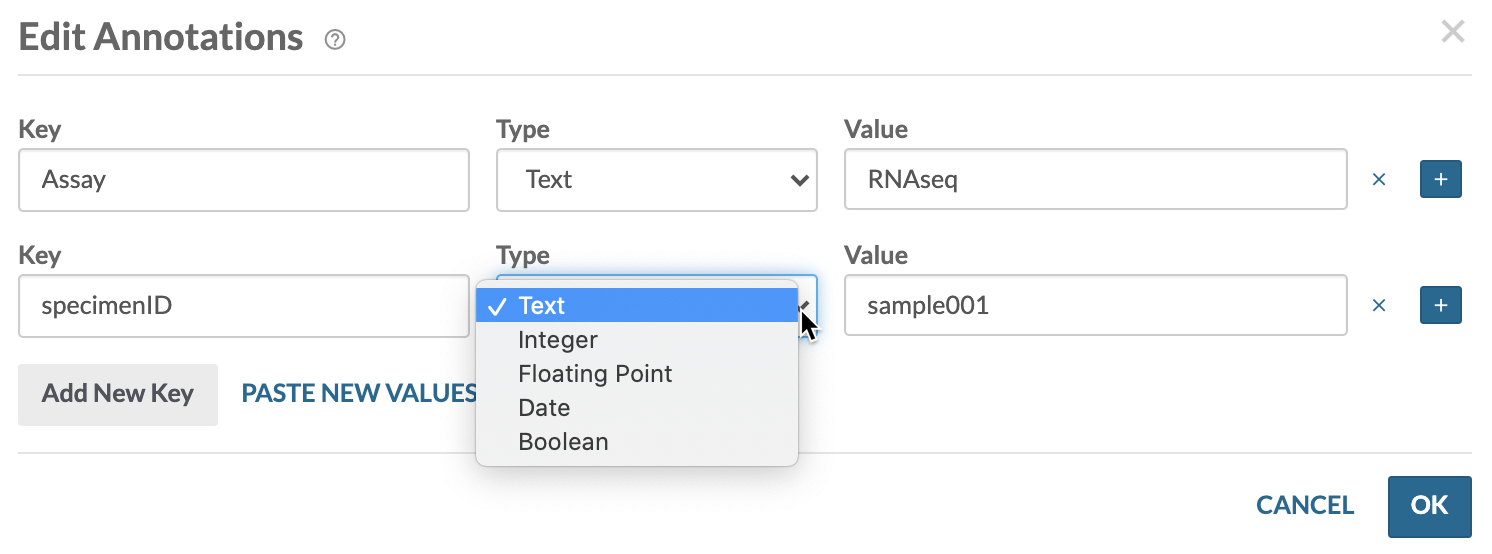
Annotations help you find files and search for data, and they are an essential component of the FAIR principles for data management. In Synapse, annotations are stored as key-value pairs, where the key defines a particular aspect of your data (for example, species, assay, file format) and the value defines a variable that belongs to that category (mouse, RNAseq, .bam). You can add annotations to projects, files, folders, tables, views, and datasets in Synapse. In this example, you will annotate the file that you uploaded in the previous section of this tutorial:
Navigate to the file and click on the file name.
Click on the File Tools menu and select Annotations.
A new panel will appear with a list of any previously added annotations for this file. Click Edit to add new annotations.
In the pop-up window, add your annotations one at a time. Use the + icon to add multiple values for a single key and the x icon to remove values. Use the Add New Key button to add a new key.
Once you add annotations to a file, you can use them to query for data, or you can build custom views to display annotation information for many files at once.
![]() For more information on creating annotations, see Annotating Data With Metadata.
For more information on creating annotations, see Annotating Data With Metadata.
Downloading Files
You can download files from the Synapse UI or using one of the programmatic clients. If you are downloading files from the web, you can either download single files at once, or you can add multiple files to a download list, which is similar to an online shopping cart. On the web, the maximum size of a download is 5 GB, or a maximum of 100 files if using the download list. To download larger files in greater numbers, we recommend using one of the programmatic clients.
Before you can download a file from Synapse, you must determine whether you have access to it. Click on a file name and look for a green or yellow lock symbol. A green unlock symbol means that the file is available for you to download. A yellow locked symbol means that the file is not available to you. Contact the project owner or click Request Access.
![]() To learn more about data access, see Sharing Settings, Permissions, and Conditions for Use.
To learn more about data access, see Sharing Settings, Permissions, and Conditions for Use.

To download a file from the web:
Navigate to the Files tab of your project and find a file to download. Note that you cannot download entire folders from the web interface, so you may need to expand a folder in the directory to see its contents.
Click the file name to see a detail page.
Click Download Options button and then Download File.
From this menu, you can also choose to Add to Download List, which will start a list of files that you can download all at once. Alternatively, you can view the Programmatic Options to see example code that you can use to download files with one of the programmatic clients.
![]() For more information on downloading from the web, see Downloading Data From the Synapse UI.
For more information on downloading from the web, see Downloading Data From the Synapse UI.
![]() For information on downloading data using an API client, see Downloading Data Programmatically.
For information on downloading data using an API client, see Downloading Data Programmatically.
![]() For more information on installing and using our API Clients, see API Clients and Documentation.
For more information on installing and using our API Clients, see API Clients and Documentation.