
Running a Challenge
Synapse enables you to host challenges, providing an excellent avenue to crowd-source new computational methods for fundamental questions in systems biology and translational medicine.
Setting up and running your own Challenge on Synapse is free*! This tutorial will teach you the steps to hosting a Challenge on Synapse. For a visual walkthrough, you can also refer to this Storylane.
Need personalized support with data governance, infrastructure setup, or any other aspect of your Challenge? Our dedicated Challenges & Benchmarking (CNB) team is here to help! Get started by outlining your Challenge plan here and a CNB team member will be in touch.
*up to 100 GB data storage
Setting Up Your Challenge
A Synapse Challenge always starts with two key Synapse entities:
Participant Team: A Synapse Team that serves as the central hub for challenge registration. Once users register for your Challenge, they will be automatically added to this team+. This makes it simple to communicate with all registered participants through the Synapse team email or by tagging the team name in a Discussion thread for announcements.
+the Team can be configured to require manager approval before participants are added
Challenge Project: A Synapse Project acts as your challenge's official "website". It is the primary place where participants can:
find all the crucial information, such as details about the challenge tasks and the scientific motivation behind them
access data (if hosted on Synapse)
make submissions
contact the challenge organizers and other participants
For challenge data, you have flexibility: you can either host the data directly on Synapse, or if the data is hosted elsewhere, you can link to it from Synapse by creating a File Link.
Keep reading to learn how to set up your Challenge, including how to create Teams, add Evaluation Queues and enable Challenge registration.
Challenge Team(s)
At a minimum, your Challenge requires a Synapse Team to be the “Registered Participants Team”. You can either use an existing Synapse Team or create a new one specifically for this challenge. We recommend a clear, descriptive name like "YOUR_CHALLENGE_NAME Participants Team" for easy identification.
If you have multiple organizers who are planning to actively manage the Challenge, we also suggest creating a separate “Organizers Team”. Using this Team will greatly streamline internal communication, simplify permission updates, and make sharing resources among your organizing group more efficient.
![]() Learn how to create and manage Teams here.
Learn how to create and manage Teams here.
Challenge Project (aka the Website)
Your Challenge “website” is technically a Synapse Project with the following features:
Evaluation Queues
Registration button
![]() To create a Synapse Project, see Creating a Project.
To create a Synapse Project, see Creating a Project.
Navigating your Challenge Project
Every Synapse Project includes several tabs relevant to managing your Challenge:
Wiki - this is where you can provide details about your Challenge.
Files - (if hosted on Synapse) this is where you can share challenge data with participants.
Tables - this is where you can create tables to view and monitor submissions.
 To add a leaderboard table into a Wiki page, see Embed a Submission View in a Wiki Page.
Challenge - (once enabled; see below) this is where you can create and manage queues for participants to submit their predictions or Docker images.
Discussion - this is where organizers and participants can interact and communicate with each other.
Enable Evaluation Queues
By default, Evaluation Queues (a Synapse feature for accepting submissions) are not enabled for Synapse Projects. To activate the Evaluation Queues feature:
Click on the Project Tools menu in the top-right corner of your Project, followed by Run Challenge.
A new window will appear, prompting you for a “Participant Team”. Enter the name of a Synapse Team you’ve designated as the participants team for your Challenge.
Click Create Challenge to save.
You’ll then be directed to a new Challenge tab within your Project. Here, you can update the Registered Participants team as needed, and create or delete Evaluation Queues.
The Challenge tab is only visible to Synapse users with "Admin" privileges to at least one Evaluation Queue.
![]() For more detailed information on how to create and manage the queues, see Evaluation Queues.
For more detailed information on how to create and manage the queues, see Evaluation Queues.
Add Challenge Registration
Participant Registration
Challenge registration can be added to a Wiki page by leveraging the Join Team Button widget. To add challenge registration:
Navigate to the Wiki page where you'd like the registration button to appear. We recommend using the main Wiki page, as it's often the first page new users see.
Click the pencil icon to Edit Project Wiki. An editing window will open.
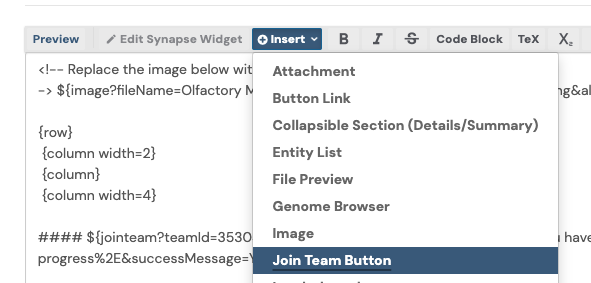
Click on +Insert then select Join Team Button:
Another window will display. Complete the fields as prompted, ensuring to enter the same Synapse Team that is currently designated as the “Registered Participants Team” for your Challenge.
Before saving the widget configuration, make sure to enable the checkbox next to “Is this a challenge sign-up?”
Click Save, and a new Markdown will be provided in the editing window. It will look something like this:
${jointeam?teamId=PARTICIPANT_TEAM_ID&isChallenge=true&isMemberMessage=Registered for CHALLENGE_NAME&text=Click Here to Register&isSimpleRequestButton=true&requestOpenText=Your registration is in progress%2E&successMessage=Your registration is in progress%2E}
Click Preview to review the button placement; move around the Markdown as needed.
Click Save to finalize the changes onto the Wiki page.
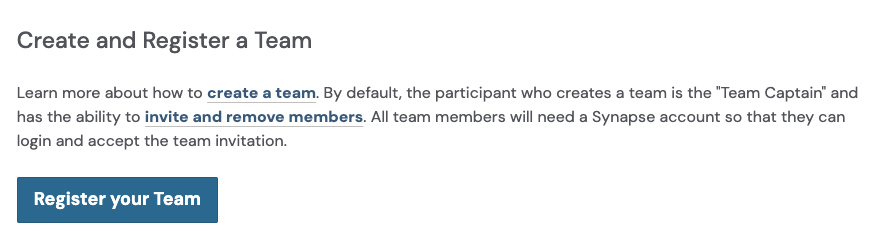
Team Registration
Once participants have registered individually, they can also register their team for your Challenge. For example:
To add a team registration button to your Challenge:
Navigate to the Wiki page where you’d like the team registration button to appear.
Click on the pencil icon to Edit Project Wiki. An editing window will open.
Add the following Markdown, replacing YOUR_CHALLENGE_ID with the ID of your Challenge (which you can find in the Challenges tab) and BUTTON_TITLE with the text you want displayed on the button:
${registerChallengeTeam?challengeId=YOUR_CHALLENGE_ID&buttonText=BUTTON_TITLE}
Click Preview to review the button and its placement. Move around the Markdown as needed.
Click Save to finalize the changes onto the Wiki page.
Upload Challenge Data
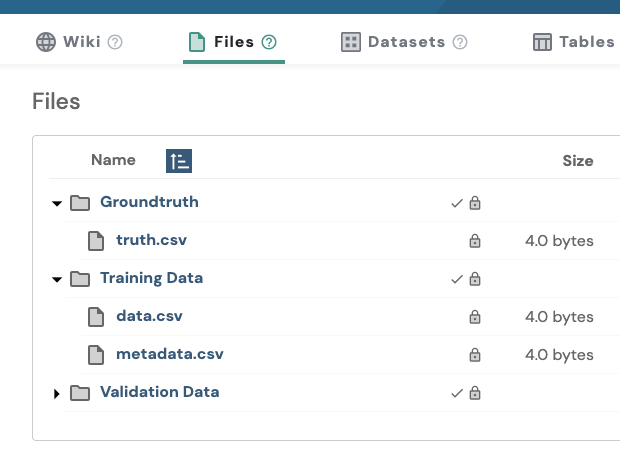
For easier file management, we recommend creating Folders first and then uploading the data into them, rather than directly uploading Files into the project. For example:
![]() Learn how to create Folders and upload Files at Uploading and Organizing Data.
Learn how to create Folders and upload Files at Uploading and Organizing Data.
Notice how these Folders (and subsequently, the Files) are marked as Private, as indicated by the lock icons. This is important because, generally, only specific users (like registered participants) should have access to the challenge data. Or even no access at all, as in the case of the "Groundtruth" Folder/Files.
We'll cover how to set these permissions in more detail below!
Example Challenge Projects
and more
Launching Your Challenge
To ensure your Challenge is discoverable, accessible, and open for registrations to anyone on the web, you will need to make your Project publicly viewable. By default, newly created Synapse Projects are only visible to the creator.
To make your Challenge publicly viewable:
Click on the Project Tools menu, followed by Project Sharing Settings.
Click Make public, then adjust the access level for All Synapse users from “Can download” to “Can view”.
Important! If your Project is hosting challenge data, please read the next section before making your Challenge public.
Important Considerations Before Launch
By default, all entities within your Synapse Project, like Files, Folders, and Submission Views, inherit the sharing settings of the main Project. However, for a challenge, you may only want registered participants to access and download the challenge data, not just anyone on the web.
Therefore, before your Challenge goes live, you may need to update the permissions for certain Synapse entities. This includes, but isn't limited to:
Challenge data
Evaluation Queues
By creating Local Sharing Settings for the data, you can ensure that the data won't become public, even after your main Challenge project does.
![]() Learn more about Local Sharing Settings.
Learn more about Local Sharing Settings.
Manage Challenge Data Permissions
Whether your challenge data is organized into Folders or uploaded directly as Files, the steps are generally the same.
Using Folders to organize your data is recommended, as setting the Local Sharing Settings on a Folder automatically applies those permissions to all Files within it, saving you the effort of individually setting permissions for each File.
To update the permissions for each Folder or File containing challenge data:
Navigate to the Files tab of your Challenge project.
For each Folder or File containing challenge data:
Click on the Folder or File to navigate to its details page
Click on the Folder Tools or File Tools menu, then select Folder Sharing Settings (for a folder) or File Sharing Settings (for a file).
In the sharing settings window, click on + Create Local Sharing Settings.
If necessary, revoke “Can download” access from all Synapse users and/or teams that should not have download permissions to the challenge data. Note: “Can edit” and “Administrator” will also have download access, so adjust users with those roles as needed as well.
Under Add More, enter the same Synapse Team currently designated as the “Registered Participants Team” for your Challenge, and set their permissions level to “Can download”.
Important: If the File is a ground truth file, do NOT share it with the Participants Team or with anyone (unless they specifically need access, e.g. an organizer).
Once you have made your changes, click Save to apply the new sharing settings.
Here's an example of what sharing settings for a Folder containing challenge data might look like:

Manage Evaluation Queues Permissions
Unlike other child entities, Evaluation Queues do not inherit settings from your main Project. By default, new queues are only accessible to the creator.
To allow others to view results and make submissions, you will need to adjust their access settings:
Navigate to the Challenge tab of your Challenge project.
For each Evaluation Queue:
Click on the three dots, followed by Modify Access.
Click Make public. Ensure that "Anyone on the web" has “Can view” permissions. This will allow anyone on the web to see submissions and their results in a Submission View or leaderboard, without needing to sign into Synapse.
Under Add More People, enter:
the same Synapse Team designated as your Challenge's "Registered Participants Team" and set their permission level to “Can submit”.
(if available) the Organizers Team for your Challenge, and set their permission level to “Can score”. This allows the organizing group members to download the submissions.
Do NOT remove yourself as "Admin" - doing so can cause irreversible changes that the Synapse IT team will be unable to assist with.
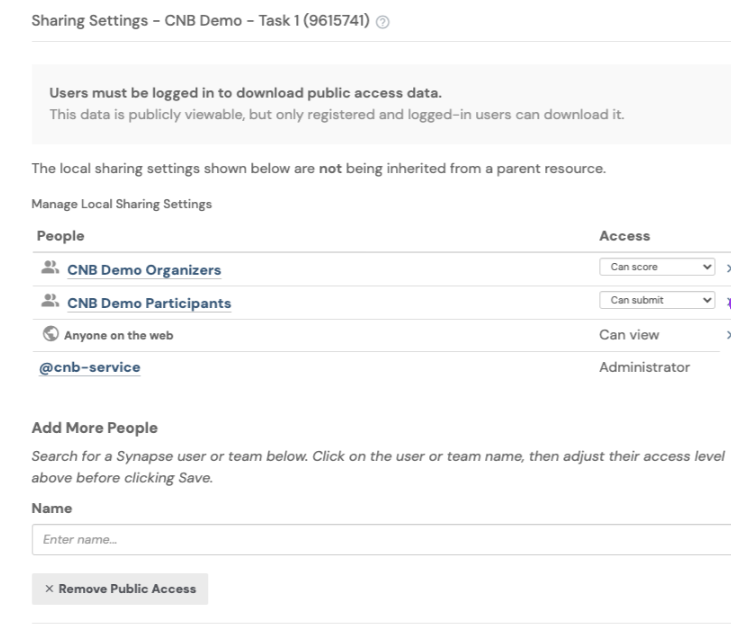
Here's an example of what sharing settings for an Evaluation Queue might look like:
![]() To learn how to evaluate submissions, see Evaluating Submissions.
To learn how to evaluate submissions, see Evaluating Submissions.
Closing Your Challenge
After your Challenge has concluded, we recommend taking the following actions:
Prevent new registrations.
To prevent users from joining the Participants Team and accessing challenge data after the challenge has ended:From the Dashboard, click on the Teams icon from the left navigation bar.
Find or search for the Synapse Team designated as the “Registered Participants Team” for your Challenge. Click on the Team to go to its team page.
Click on the Team Actions menu, followed by Edit Team.
Under Access, select “Team is locked, users may not join or request access. New users must be invited by a team manager.”
Disable registration on your website.
Remove or hide all Join Team Button widgets to disable Challenge registration directly on the website. You can replace the registration button with an informative alert like this: HTML
HTML<div class="alert alert-success"> ###! Challenge closed 🏆 Final results are [available here](YOUR_LINK_HERE). Thank you to all who participated! </div>
To add this alert, paste the HTML above into the Wiki editing window.
Stop active Evaluation Queue(s).
If any Evaluation Queues are still active, be sure to stop them.
For safe measure, you can also remove “Can submit” permissions from the Participants team to prevent any post-challenge submissions.